

The worst part has to be the calluses though, especially when they split in the middle of learning a new trick. One of mine between my third and forth fingers gave way practicing a combination spin this morning during open session and I had no way of dealing with the thing until I got home nearly an hour later. So, I found this wonderful little DIY to help make sure that emergencies, and having to wait to fix them, become a thing of the past.
Miss Emergency Rescue Kit
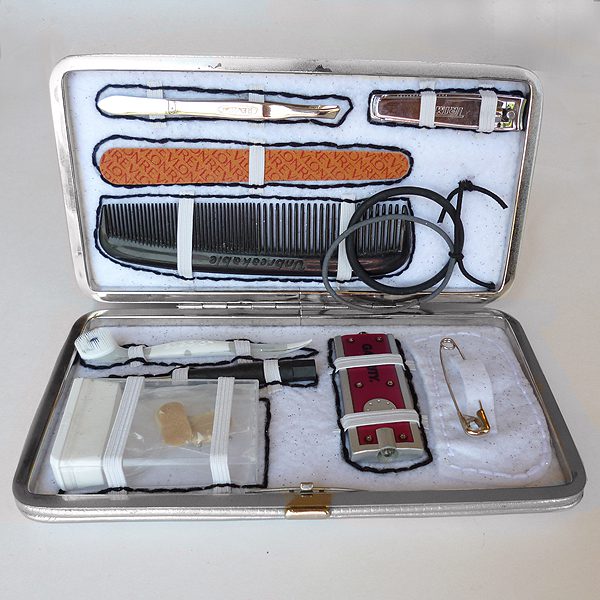
You can chop and change as many of the items as you like but this is what wound up in the pictured kit.
You'll need:
- bandaids *
- pain medication *
- nail file *
- clear fingernail polish
- little scissors
- mini toothbrush *
- emergency cash *
- tweezers *
- feminine needs
- hankie
- pen & small post its
- needle and thread
- hair tie *
- bobby pins *
- cough drops
- safety pins (aka risque cleavage rescue) *
- deodorant
- stain remover pen
- mirror
- breath mints
- dental floss
- lip balm
- specialty medicine (i.e. cold sore medicine) *
- spare earring backs *
- glasses repair kit *
- nail clippers *
- mini flashlight *
- extra house and car keys *
- chocolate (because who doesn’t need emergency chocolate from time to time * (Friendly tip, Tootsie Rolls don’t melt!)
If you know what is going into yours, here are the supplies you’ll need to wrangle up:
- wallet
- empty Tic Tac container
- thin cardboard (like from a gift box)
- regular cardboard
- felt
- thin elastic
- embroidery floss and needle
- spray adhesive
- fabric marking pen
- optional – spray paint
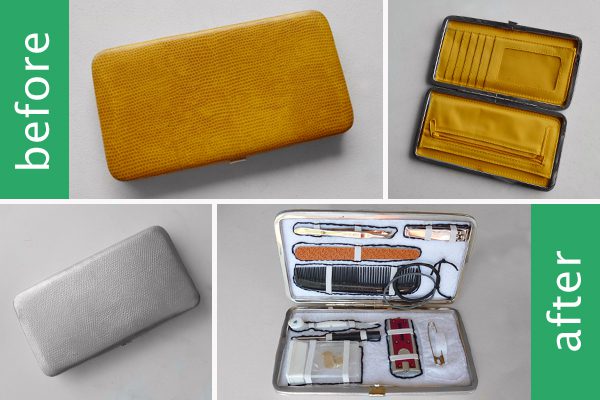
Step 1: If you want to change the
exterior color of your wallet, go ahead and do that first. Mine started
yellow and wound up silver! Use as many coats as necessary to get a
nice, even finish. Allow to dry fully before moving on.
Remove the inside portions of your
wallet. If you need assistance, shove a butter knife into a credit card
slot for a bit of extra leverage. Trace one of the inserts on your felt
plus your light and regular cardboard twice (one for each side). Trim
the felt and light cardboard exactly as is, but trim the heavier
cardboard a smidge (about an 1/8th of an inch) in from your traced line.
Step 2: Place both pieces of your felt
face up in front of you. Gather your rescue products and put any small
things together in your Tic Tac container. Situate your supplies on top
of your felt pieces until you get as many as you can to fit.
If you have more items than room, you
may have to cut out one or two of your less needed items. Don’t forget
that the edges will slip underneath to hold the insert in – that space
needs to be left clear in order for that to happen. I kept a quarter
inch all around clear, just to be safe.
If you want a pocket, cut out of your
felt and place with your other items. I added a little strap onto my
pocket to keep my emergency safety pin.
Step 3: Use your fabric marking pen to trace the outline of each item as it lays on the felt.
Take your embroidery thread and begin
stitching on your drawn outlines. I used 6 strands for very heavy lines,
but the amount of floss you use is up to you. The more strands you use
the thicker the lines, the less the finer.
Step 4: Elastic is what will hold in
the majority of your items. For longer things, like tweezers, it is a
good idea to use two pieces – one near the top and one near the bottom.
While stitching your drawn lines,
include your elastic as needed. This will save you from having to go
back and stitch your elastic on later.
If you’re adding a pocket, sew that on
now also. You can also add extra storage room by cutting a ponytail
holder in half and tacking it down in the middle. You will be able to
use that to tie in things like other ponytail holders!
Step 5: Now it’s time to put your
wallet back together. Place your heavier piece of cardboard in first.
If it’s a bit too big, trim as necessary.
Spray your lighter weight cardboard
liberally with spray adhesive. Allow to become tacky and then place your
felt piece onto the glue to adhere. Use your hands to smooth out and
remove any creases or air pockets. Allow a few minutes to fully dry.
Step 6: Place your inserts into the
wallet. If they are side specific, make sure that you’re placing them
correctly. Shove two of the sides directly under the metal rim. The
other two you’ll need to use an implement, like a small flat screwdriver
to help seat the felt piece fully.
Fill your rescue kit with all of your
emergency goodies, snap it shut, toss it in your purse and call it a
day! The next time you find a run in your hose, a splinter in your
finger, or any other little emergency decides to rear its ugly head,
you’ll be fully prepared to take it on!
No comments:
Post a Comment